
1. Scope* 1.1 This specification covers several grades of carbon and alloy steel seamless mechanical tubing. The grades are listed in Tables 1-3. When welding is used for joining the weldable mechanical tube grades, the welding procedure shall be suitable for the grade, the condition of the...
Online Inquiry
1. Scope*
1.1 This specification covers several grades of carbon and alloy steel
seamless mechanical tubing. The grades are listed in Tables 1-3. When welding
is used for joining the weldable mechanical tube grades, the welding
procedure shall be suitable for the grade, the condition of the components, and
the intended service.
1.2 This specification covers both seamless hot-finished mechanical tubing
and seamless cold-finished mechanical tubing in sizes up to and including
12 3⁄4 in. (323.8 mm) outside diameter for round tubes with wall thicknesses as
required.
1.3 The tubes shall be furnished in the following shapes, as specified by
the purchaser: round, square, rectangular, and special sections.
1.4 Supplementary requirements of an optional nature are provided and when
desired shall be so stated in the order.
1.5 The values stated in inch-pound units are to be regarded as the
standard. The values given in parentheses are for information only.
2. Referenced Documents
2.1 ASTM Standards: 2
A 370 Test Methods and Definitions for Mechanical Testing of Steel
Products
E 59 Practice for Sampling Steel and Iron for Determination of Chemical Composition3
2.2 Military Standards:
MIL-STD-129 Marking for Shipment and Storage4
MIL-STD-163 Steel Mill Products Preparation for Shipment and
Storage4
2.3 Federal Standard: Fed. Std. No. 123 Marking for Shipment (Civil
Agencies)4
3. Ordering Information
3.1 Orders for material under this specification should include the
following, as required, to describe the desired material adequately:
3.1.1 Quantity (feet, weight, or number of pieces),
3.1.2 Name of material (seamless carbon or alloy steel mechanical
tubing),
3.1.3 Form (round, square, rectangular or special shapes,Section 1),
3.1.4 Dimensions (round, outside diameters and wall thickness,Section 8; square
and rectangular, outside dimensions and wall thickness, Section 9; other,
specify),
3.1.5 Length (specific or random, mill lengths, see 8.5 and9.5),
3.1.6 Manufacture (hot finished or cold finished, 4.5 and4.6),
3.1.7 Grade (Section 5),
3.1.8 Condition (sizing method and thermal treatment, Section12),
3.1.9 Surface finish (special pickling, shot blasting, or ground outside
surface, if required),
3.1.10 Specification designation,
3.1.11 Individual supplementary requirements, if required,
3.1.12 End use, if known,
3.1.13 Packaging,
3.1.14 Product analysis and chemical analysis, if required (Section 6 and
Section 7),
3.1.15 Specific requirements, or exceptions to this specification,
3.1.16 Special marking (Section 15), and
3.1.17 Special packing (Section 16).


TABLE 3 Chemical Requirements for Alloy Steels
NOTE 1—The ranges and limits in this table apply to steel not exceeding 200
in.2(1290 cm2) in cross-sectional area.
NOTE 2—Small quantities of certain elements are present in alloy steels which
are not specified or required. These elements are considered as incidental and
may be present to the following maximum amounts: copper, 0.35 %; nickel, 0.25
%; chromium, 0.20 %; molybdenum, 0.10 %.
NOTE 3—The ranges and limits given in this table apply to heat analysis; except
as required by 6.1, product analyses are subject to the applicable additional
tolerances given in Table Number 5.


A
Grades shown in this table with prefix letter E generally are manufactured by
the basic-electric-furnace process. All others are normally manufactured by the
basic-open-hearth process but may be manufactured by the basic-electric-furnace
process with adjustments in phosphorus and sulfur.
B Grades shown in this table with the letter B, such as 50B40, can be expected
to have 0.0005 % minimum boron control.
C The phosphorus sulfur limitations for each process are as follows:
Basic electric furnace 0.025 max % Acid electric furnace 0.050 max %
Basic open hearth 0.040 max % Acid open hearth 0.050 max %
D Minimum and maximum sulfur content indicates resulfurized steels.
E The purchaser may specify the following maximum amounts: copper, 0.30 %;
aluminum, 0.050 %; and oxygen, 0.0015 %.

TABLE
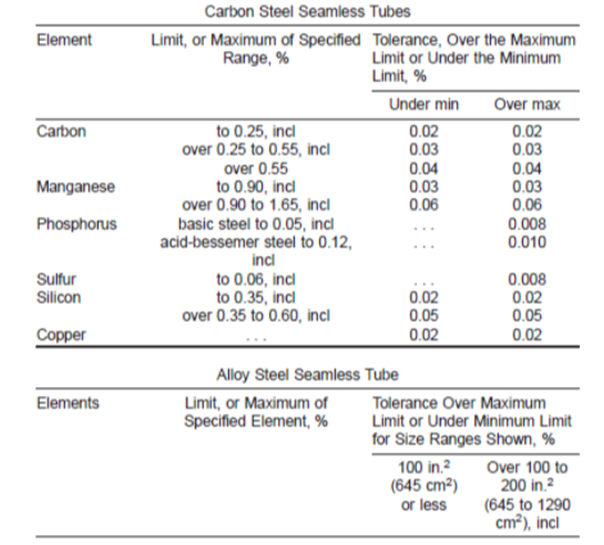
5 Product Analysis Tolerances Over or Under Specified Range or Limit
NOTE 1—Individual determinations may vary from the specified heat limits or
ranges to the extent shown in this table except that any element in a heat may
not vary both above and below a specified range.
NOTE 2—In all types of steel, because of the degree to which phosphorus and
sulfur segregate, product analysis for these elements is not technologically
appropriate for rephosphorized or resulfurized steels unless misapplication is
clearly indicated.


A Diameter tolerances are not applicable to normalized and tempered or quenched and tempered conditions.
B
The common range of sizes of hot finished tubes is 11⁄2 in. (38.1 mm) to 103⁄4
in. (273.0 mm) outside diameter with wall thickness at least 3 % or more of
outside diameter, but not less than 0.095 in. (2.41 mm).
C Larger sizes are available; consult manufacturer for sizes and tolerances.


A Many tubes with inside diameter less than 50 % of outside diameter or with
wall thickness more than 25 % of outside diameter, or with wall thickness over
11⁄4 in., or weighing more than 90 lb/ft, are difficult to draw over a mandrel.
Therefore, the inside diameter can vary over or under by an amount equal to 10
% of the wall thickness.
See also Footnote B.
B For those tubes with inside diameter less than 1⁄2 in. (or less than 5⁄8 in.
when the wall thickness is more than 20 % of the outside diameter), which are
not commonly drawn over a mandrel, Footnote A is not applicable. Therefore, for
those tubes, the inside diameter is governed by the outside diameter tolerance
shown in this table and the wall thickness tolerances shown in Table Number 9.
C Tubing having a wall thickness less than 3 % of the outside diameter cannot
be straightened properly without a certain amount of distortion. Consequently
such tubes, while having an average outside diameter and inside diameter within
the tolerances shown in this table, require an ovality tolerance of 1⁄2 % over
and under nominal outside diameter, this being in addition to the tolerances
indicated in this table.
D 1 in. = 25.4 mm.


A Many tubes with inside diameter less than 50 % of outside diameter or with
wall thickness more than 25 % of outside diameter, or with wall thickness over
11⁄4 in., or
weighing more than 90 lb/ft, are difficult to draw over a mandrel. Therefore,
the inside diameter can vary over or under by an amount equal to 10 % of the
wall thickness.
See also Footnote B.
B For those tubes with inside diameter less than 1⁄2 in. (or less than 5⁄8 in.
when the wall thickness is more than 20 % of the outside diameter), which are
not commonly drawn over a mandrel, Footnote A is not applicable. Therefore, for
those tubes, the inside diameter is governed by the outside diameter tolerance
shown in this table and the wall thickness tolerances shown in Table Number
9.
C Tubing having a wall thickness less than 3 % of the outside diameter cannot
be straightened properly without a certain amount of distortion. Consequently
such tubes, while having an average outside diameter and inside diameter within
the tolerances shown in this table, require an ovality tolerance of 1⁄2 % over
and under nominal outside diameter, this being in addition to the tolerances
indicated in this table.
D 1 in. = 25.4 mm.
SUNRISE is well-known as one of the leading astma519 seamless alloy steel mechanical tubing manufacturers and suppliers in China for its quality products and excellent service. We warmly welcome you to buy the quality and durable steel products from our factory.